
DRIP IRRIGATION

Also
known as trickle irrigation which refers to the application of water directly
through the root zone through small emitters which have precise quantity of water per hour.
Water is applied through low pressure pipe network comprising mains, submains,
laterals and emitting devices. This could reach root zone with minimum water
loss.
v High
initial cost but more economical in the long run.
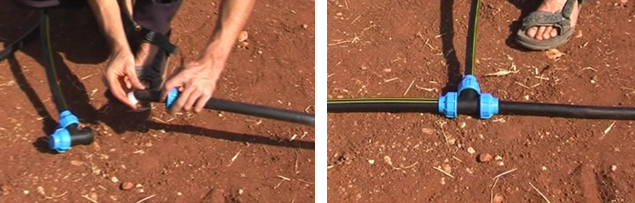
v Efficient
and economical use of water and conserves
power use.
v Drip-fertigation
improves fertilizer use efficiency.
v Productivity
increase with lesser and more efficient use of water and fertilizer.
Procedure:
1.
Choose an area where to install drip irrigation.
 |
The
area must be flat or on a moderate decline
|
 |
It
must be close to water source
|
 |
| It
must have sufficient exposure to sunlight |
 |
The
area should be prepared before installation and must have no vegetation and
stones.
2.
Choose appropriate water container. It must cleaned before placed. Prepare a
stand.

3.
Place the container at the highest point in the area. Make sure the stand is
stable and secure.
4.
The height of the tank from the bottom of the tank must be at least….
  5. Punch a hole 5 cm above the bottom of the container. The Jain dripkit adapter will be attached here. Attach PVC female reducer coupling.  6. Connect PVC ball valve SU ¾” male & female.  7. Before inserting the NDJ filter nylon screen to the PVC ball valve cover it with teflon.  8. Attach female elbow and add 25 mm Jain LLDPE (Linear Low Density PolyEthylene) twin line hose. 
9.
Attach another female elbow at the end of Jain LLDPE Twin line hose then attach
the tee.

10.
Lay-out the submain line. Below are the different layout option for 250 m2
drip kit.
Layout
samples not to scale. Below layouts are only for example. There can be several
other layouts possible.
12.
Use poly end stop to enclose the end of the submain line.

13.
Connect drip lines or drip tube to submain.
(Drip lines has built in emitter while you
could punch holes at your desired distance in drip tube.)
14.
To punch holes on submain line use punch & pusher 7.5mm if you will use
16mm take off adapter starter or use punch & pusher 4.5mm if you will use
12mm take off adapter starter.

15.
Connect the take off adapter barbed to drip line.

16.
Join the take off adapter barbed with drip hose to take off adapter
starter.

17.
Lay out the drip lines along the plot. Cut the end and enclose it with poly end
stop . Use C-clip tube holding stake to elevate the drip lines.

18.
Run and test the system.
19.
Make sure that the container is full with clean water before and during
irrigation.
 MAINTENANCE OF DRIP IRRIGATION
FILTER
The
filter prevents dirt and other particles from entering the system. It needs to
be cleaned daily before irrigation.

REPAIRING PUNCTURE SUBMAIN.
If
the submain leaked, cut the submain and attach compression joiner.

REPAIRING PUNCTURE DRIPLINE.
In
case drip line puncture, cut the drip line and attach the turbo aqura joiner or
poly joiner.

DETACHING THE DRIPLINE
If
you want to detach the drip line, you may cover the take off adapter starter
using the take off end plug.

We always serve you! HARBEST AGRI+ENGINEERING
Taytay Office Lot 1, Blk 1, Rizal TechnoPark Brgy. San Juan, Highway 2000 Taytay, Rizal Tel.No.: (02) 2605806; (02) 370-9768; Email us : harbesthydrobest@yahoo.com; harbestengineering@gmail.com
website: https://harbesthydrobest.weebly.com/
|